QWidget是Qt框架中所有用户界面对象的基类,它有以下特点:
所有窗口类的基类
Qt中有3个窗口的基类:QWidget、QMainWindow、QDialog,其中QMainWindow、QDialog都继承自QWidget
在创建Qt工程时,通常需要选择三者之一作为当前窗口的基类所有控件类的基类
Qt中的控件,比如按钮、输入框、单选框、表格控件等,都是直接或间接地继承自QWidget内嵌窗口、独立窗口
可以内嵌到其他窗口的内部,此时需要给其指定父窗口
可以作为独立的窗口显示,此时无需给其指定父窗口
1. 效果演示
本节演示QWidget作为内嵌窗口和独立窗口、窗口的大小和位置、窗口的标题和图标,如下: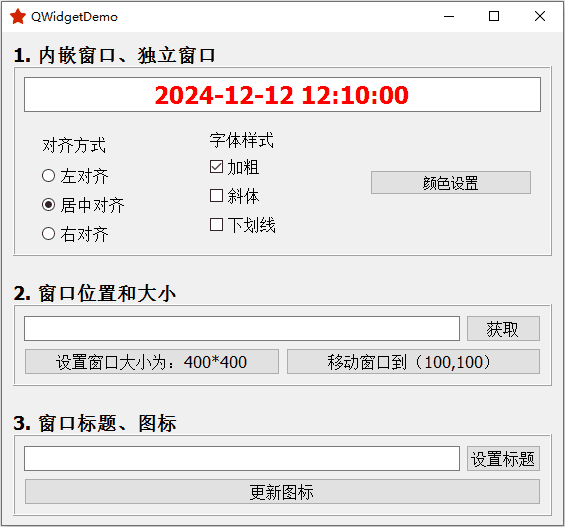
2. 属性和方法
QWidget有很多属性,完整的可查看帮助文档,这里列出常用的属性和方法。
2.1 窗口位置
以下截图来自官方文档: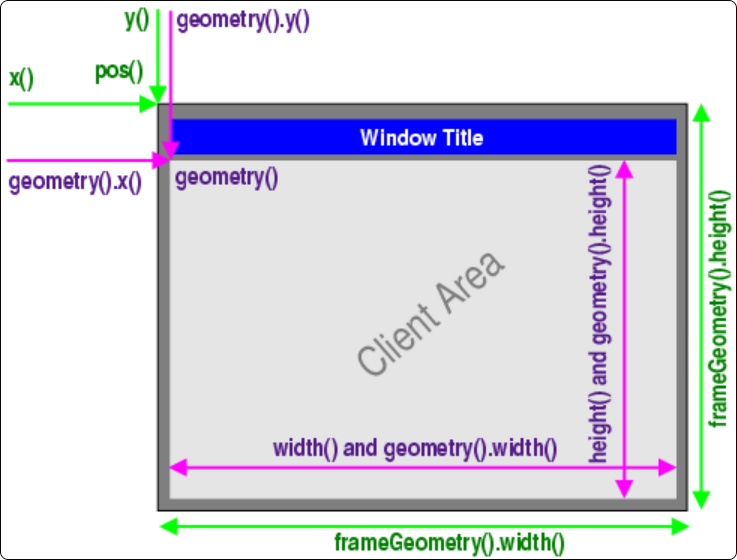
// 1、设置窗体的几何信息
// 获取相对于当前窗口父窗口的几何信息:宽高、坐标点信息
// 不包含标题栏
const QRect &geometry() const;
void setGeometry(int x, int y, int w, int h);
void setGeometry(const QRect &);

// 获取相对于当前窗口父窗口的几何信息:宽高、坐标点信息
// 包含标题栏
QRect frameGeometry() const

// 2、移动窗口。
// 重新设置窗口的位置
void move(int x, int y);
void move(const QPoint &);
2.2 窗口大小
通常,窗口可以拖动其右下角,进行放大和缩小。
可以设置窗口的最小大小和最大大小。另外,窗口可以设置为固定大小,这样窗口就不能放大和缩小
常用的设置大小的函数如下:
// 1、设置窗口尺寸
QSize size() const
void resize(int w, int h);
void resize(const QSize &);

// 2、设置最大尺寸
QSize maximumSize() const;
void setMaximumSize(const QSize &);
void setMaximumSize(int maxw, int maxh);

// 3、设置最小尺寸
QSize minimumSize() const;
void setMinimumSize(const QSize &);
void setMinimumSize(int minw, int minh);

// 4、设置固定尺寸
void setFixedSize(const QSize &s);
void setFixedSize(int w, int h);

// 5、单独设置窗口的高度
int height() const;
int minimumHeight() const;
int maximumHeight() const;

void setFixedHeight(int h);
void setMaximumHeight(int maxh);
void setMinimumHeight(int minh);

// 6、单独设置窗口的宽度
int width() const;
int minimumWidth() const;
int maximumWidth() const;

void setFixedWidth(int w);
void setMaximumWidth(int maxw);
void setMinimumWidth(int minw);
2.3 窗口标题、图标、资源文件
设置和获取窗口的标题,直接使用如下两个函数即可:
// 获取和设置窗口的标题
QString windowTitle() const;
void setWindowTitle(const QString &);设置窗口的图标,需要一个QIcon对象,如下:
// 获取和设置窗口的图标
QIcon windowIcon() const;
void setWindowIcon(const QIcon &icon);

// 构造 QIcon 图标对象
// 有 6 个重载的构造方法,通常我们使用最后一个
// 参数为图标文件的路径
QIcon::QIcon(const QString &fileName);
2.4 获取父控件/子控件
// 获取父控件、子控件列表
QWidget *QWidget::parentWidget() const
const QObjectList &QObject::children() const
2.5 信号槽
// 最大化显示
void showMaximized();

// 最小化显示
void showMinimized();

// 正常显示
void showNormal();

// 关闭窗口
bool close();
3. 从零实现
从零写代码实现整体效果,以演示标签的属性以及信号槽的用法
3.1 布局
在UI设计师界面,拖拽对应的控件,修改显示的文字、控件的名称,然后完成布局
- 合理地使用了水平、垂直、栅格布局
- 合理地使用弹簧
- 合理地调整
Layout的各种参数,来设置外边距、内边距 - 合理地调整字体大小
即可完成以下效果,多操作自然就熟练了(完成后的代码,会一并共享给大家的~)
布局完成效果如下: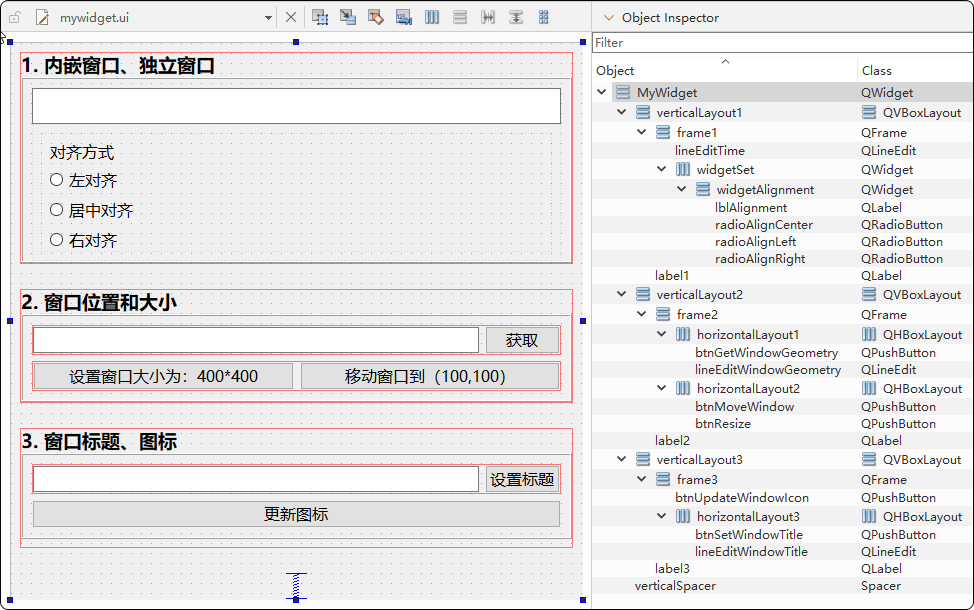
3.2 添加资源文件
把用到的图标,作为资源文件添加到项目中
首先,把图片文件拷贝到项目的res目录中,如下: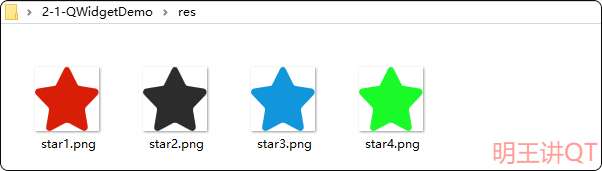
然后,在左侧项目上右键,新建一个 “Qt Resource File” 类型的文件,命名为res,如下: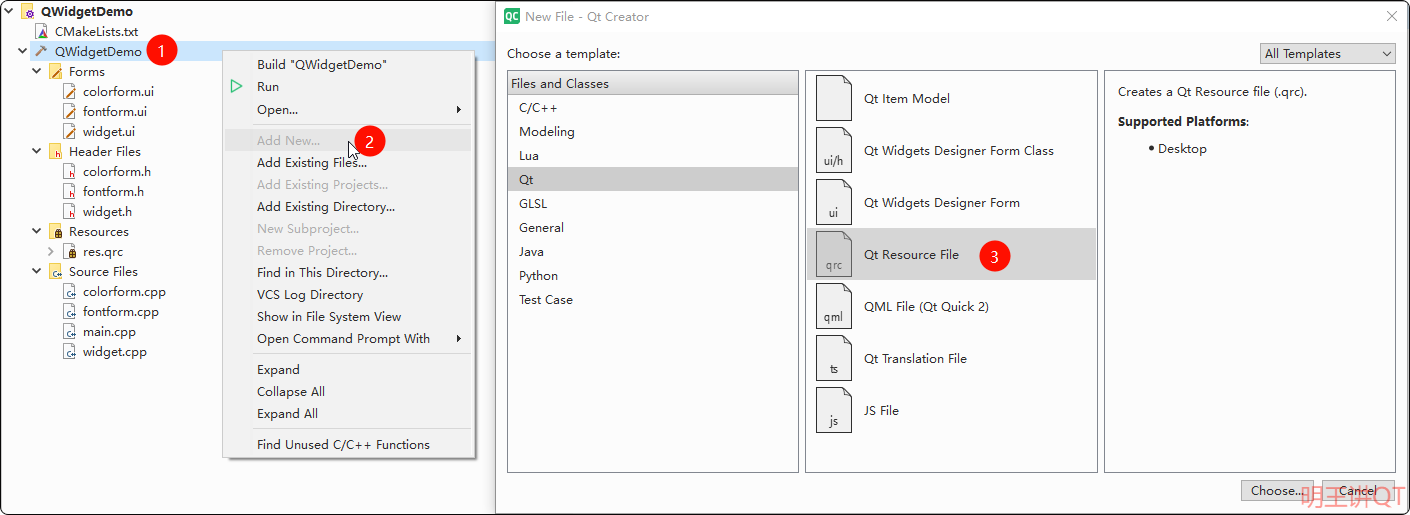
最后,先后点击 “Add Prefix” 和 “Add Files”,即可将4张图片添加到项目中,如下: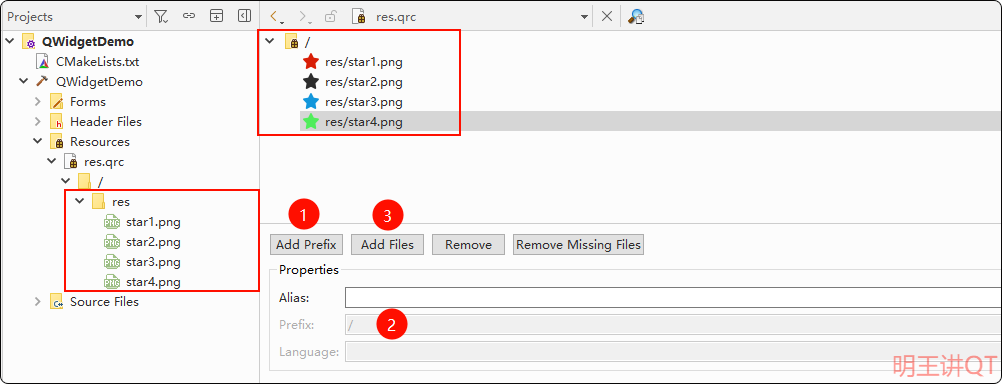
3.3 代码实现
接下来,开始写代码实现以上效果。
3.3.1 内嵌窗口、独立窗口
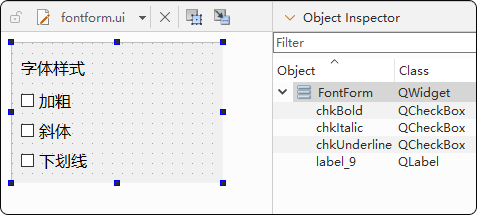
首先,添加字体设置和颜色设置对应的布局
在项目名右击->【Add New…】->【Qt】->【Qt Widgets Designer Form Class】,创建出新的QWidget布局和源码文件,如下: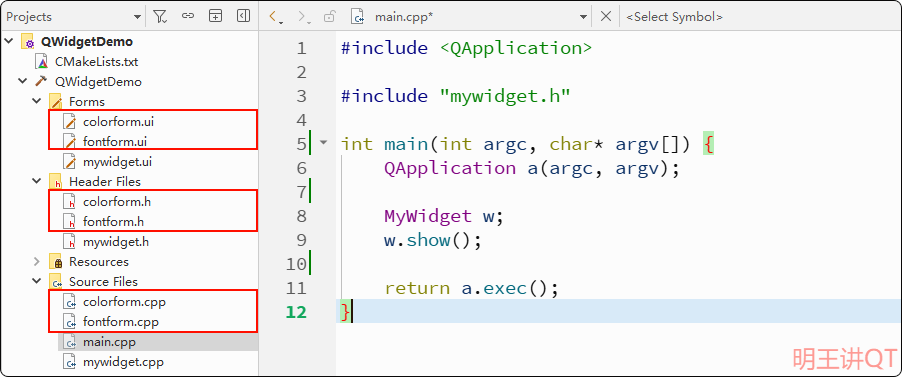
此时,新建的两个QWidget布局文件,如下:
 |
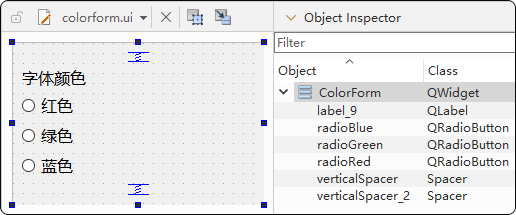 |
然后,在fontform.h/.cpp文件中,实现对应的信号槽,如下:
// fontform.h
class FontForm : public QWidget {

signals:
    void fontChanged(bool bold, bool italic, bool underline);

private slots:
    void onChkFontClicked();
};

// fontform.cpp
FontForm::FontForm(QWidget *parent) : QWidget(parent), ui(new Ui::FontForm) {
    ui->setupUi(this);

    connect(ui->chkBold, &QCheckBox::clicked, this, &FontForm::onChkFontClicked);
    connect(ui->chkItalic, &QCheckBox::clicked, this, &FontForm::onChkFontClicked);
    connect(ui->chkUnderline, &QCheckBox::clicked, this, &FontForm::onChkFontClicked);
}

void FontForm::onChkFontClicked() {
    emit fontChanged(ui->chkBold->isChecked(), ui->chkItalic->isChecked(), ui->chkUnderline->isChecked());
}然后,在colorform.h/.cpp文件中,实现对应的信号槽,如下:
// colorform.h
#include <QButtonGroup>

class ColorForm : public QWidget {

signals:
    void colorChanged(int id);

private slots:
    void onBtnGroupColorClicked(int id);

private:
    QButtonGroup *btnGroupColor;
};

// colorform.cpp
ColorForm::ColorForm(QWidget *parent) : QWidget(parent), ui(new Ui::ColorForm) {
    ui->setupUi(this);

    btnGroupColor = new QButtonGroup(this);
    btnGroupColor->addButton(ui->radioRed, 0);
    btnGroupColor->addButton(ui->radioGreen, 1);
    btnGroupColor->addButton(ui->radioBlue, 2);

    connect(btnGroupColor, &QButtonGroup::idClicked, this, &ColorForm::onBtnGroupColorClicked);
    ui->radioRed->click();
}

void ColorForm::onBtnGroupColorClicked(int id) {
    emit colorChanged(id);
}最后,在mywidget.h/.cpp文件中,实现对应的信号槽,如下:
// mywidget.h
#include <QButtonGroup>
#include "colorform.h"

class MyWidget : public QWidget {
private slots:
    // 1. 内嵌窗口、独立窗口
    void onBtnGroupAlignmentClicked(int id);
    void onFontChanged(bool bold, bool italic, bool underline);
    void onColorChanged(int id);

private:
    QButtonGroup *btnGroupAlignment;
    ColorForm *colorForm;
};

// mywidget.cpp
#include <QPushButton>
#include "fontform.h"

MyWidget::MyWidget(QWidget* parent) : QWidget(parent), ui(new Ui::Widget) {
    ui->setupUi(this);

    // 1. 内嵌窗口、独立窗口
    // 对齐设置
    ui->lineEditTime->setText("2024-12-12 12:10:00");

    btnGroupAlignment = new QButtonGroup(this);
    btnGroupAlignment->addButton(ui->radioAlignLeft, 0);
    btnGroupAlignment->addButton(ui->radioAlignCenter, 1);
    btnGroupAlignment->addButton(ui->radioAlignRight, 2);

    connect(btnGroupAlignment, &QButtonGroup::idClicked, this, &MyWidget::onBtnGroupAlignmentClicked);
    ui->radioAlignCenter->click();

    // 字体设置
    FontForm* fontForm = new FontForm();
    ui->widgetSet->layout()->addWidget(fontForm);
    fontForm->setWindowTitle("字体设置");

    connect(fontForm, &FontForm::fontChanged, this, &MyWidget::onFontChanged);

    // 颜色设置
    QPushButton* btnColor = new QPushButton("颜色设置");
    btnColor->setStyleSheet("QPushButton { font-size: 14px; }");
    ui->widgetSet->layout()->addWidget(btnColor);
    connect(btnColor, &QPushButton::clicked, this, [=] { colorForm->show(); });

    colorForm = new ColorForm();
    colorForm->setWindowTitle("颜色设置");
    colorForm->setFixedWidth(300);
    connect(colorForm, &ColorForm::colorChanged, this, &MyWidget::onColorChanged);

    ui->lineEditTime->setStyleSheet("QLineEdit {color: red};");
}

void MyWidget::onBtnGroupAlignmentClicked(int id) {
    if (id == 0) {
        ui->lineEditTime->setAlignment(Qt::AlignLeft);
    } else if (id == 1) {
        ui->lineEditTime->setAlignment(Qt::AlignCenter);
    } else if (id == 2) {
        ui->lineEditTime->setAlignment(Qt::AlignRight);
    }
}

void MyWidget::onFontChanged(bool bold, bool italic, bool underline) {
    QFont font = ui->lineEditTime->font();

    font.setBold(bold);
    font.setItalic(italic);
    font.setUnderline(underline);

    ui->lineEditTime->setFont(font);
}

void MyWidget::onColorChanged(int id) {
    if (id == 0) {
        ui->lineEditTime->setStyleSheet("QLineEdit {color: red};");
    } else if (id == 1) {
        ui->lineEditTime->setStyleSheet("QLineEdit {color: green};");
    } else if (id == 2) {
        ui->lineEditTime->setStyleSheet("QLineEdit {color: blue};");
    }
}
3.3.2 窗口位置、大小
首先,在mywidget.h文件中,声明槽函数,如下:
class MyWidget : public QWidget {
private slots:
    // 2. 窗口大小和位置
    void on_btnGetWindowGeometry_clicked();
    void on_btnResize_clicked();
    void on_btnMoveWindow_clicked();
};然后,在widget.cpp文件中,实现槽函数,如下:
void MyWidget::on_btnGetWindowGeometry_clicked() {
    // QRect rect = this->frameGeometry();
    QRect rect = this->geometry();
    QPoint topLeft = rect.topLeft();
    int width = rect.width();
    int height = rect.height();
    ui->lineEditWindowGeometry->setText(QString("左上角(%1,%2),  宽高(%3*%4)").arg(topLeft.x()).arg(topLeft.y()).arg(width).arg(height));
}

void MyWidget::on_btnResize_clicked() {
    this->resize(400, 400);
}

void MyWidget::on_btnMoveWindow_clicked() {
    this->move(100, 100);
}
3.3.3 窗口标题、图标
首先,在mywidget.h文件中,声明槽函数,如下:
class MyWidget : public QWidget {
private slots:
    // 3. 设置窗口标题和图标
    void on_btnSetWindowTitle_clicked();
    void on_btnUpdateWindowIcon_clicked();
};然后,在mywidget.cpp文件中,实现槽函数,如下:
QStringList icons = {":/res/star1.png", ":/res/star2.png", ":/res/star3.png", ":/res/star4.png"};

void MyWidget::on_btnSetWindowTitle_clicked() {
    this->setWindowTitle(ui->lineEditWindowTitle->text().trimmed());
}

// 需要在 CMakeLists.txt 中增加一行: set(CMAKE_AUTORCC ON)
void MyWidget::on_btnUpdateWindowIcon_clicked() {
    static int index = 0;
    this->setWindowIcon(QIcon(icons[index++ % 4]));
}
3.4 资源文件不生效的问题
在代码中引用资源文件时,不生效,如何解决呢?
解决方法:在CMakeLists.txt中增加如下一行
set(CMAKE_AUTORCC ON)当设置为ON时,CMake会自动识别项目中的.qrc文件,并自动调用Qt的rcc(Resource Compiler) 工具将它们编译成C++代码,然后链接到你的程序中。
- 未开启
AUTORCC时,编译过程:
[1/7 1.0/sec] Automatic MOC and UIC for target QWidgetDemo
[2/7 0.4/sec] Building CXX object CMakeFiles/QWidgetDemo.dir/main.cpp.obj
[3/7 0.6/sec] Building CXX object CMakeFiles/QWidgetDemo.dir/QWidgetDemo_autogen/mocs_compilation.cpp.obj
[4/7 0.8/sec] Building CXX object CMakeFiles/QWidgetDemo.dir/colorform.cpp.obj
[5/7 1.0/sec] Building CXX object CMakeFiles/QWidgetDemo.dir/fontform.cpp.obj
[6/7 1.1/sec] Building CXX object CMakeFiles/QWidgetDemo.dir/mywidget.cpp.obj
[7/7 1.2/sec] Linking CXX executable QWidgetDemo.exe- 开启
AUTORCC时,编译过程:
[1/9 0.7/sec] Automatic MOC and UIC for target QWidgetDemo
[2/9 1.3/sec] Automatic RCC for res.qrc
[3/9 1.8/sec] Building CXX object CMakeFiles/QWidgetDemo.dir/QWidgetDemo_autogen/EWIEGA46WW/qrc_res.cpp.obj
[4/9 0.5/sec] Building CXX object CMakeFiles/QWidgetDemo.dir/main.cpp.obj
[5/9 0.6/sec] Building CXX object CMakeFiles/QWidgetDemo.dir/QWidgetDemo_autogen/mocs_compilation.cpp.obj
[6/9 0.7/sec] Building CXX object CMakeFiles/QWidgetDemo.dir/fontform.cpp.obj
[7/9 0.9/sec] Building CXX object CMakeFiles/QWidgetDemo.dir/colorform.cpp.obj
[8/9 0.9/sec] Building CXX object CMakeFiles/QWidgetDemo.dir/mywidget.cpp.obj
[9/9 0.9/sec] Linking CXX executable QWidgetDemo.exe可见,开启了AUTORCC后,会把资源文件转换为qrc_res.cpp文件(在编译目录中可以看到该文件),并编译链接到可执行文件中
4. 点赞、获取源码
看到这里的小伙伴,去B站给明王一个【免费的点赞】吧,你的支持,是我持续更新优质内容的动力,感谢~
源码下载地址
链接: https://pan.baidu.com/s/10adpWc0h6jPyWYe5uJfZuQ
提取码: ming